Cool garland like Alex Gaiver (WS2812)
This cool garland is assembled according to the design of Alex Hyvera using Arduino and an address LED strip. The garland has many interesting effects, a running text, several games and the ability to control all this from a mobile phone. The garland is really very cool, it just causes a storm of emotions in the audience.
I soldered the garland myself, cut the WS2812 addressable LED strip into modules, soldered with the help of pieces of audio cable with a cross section of 0.25 mm. I got a total of 120 diodes. The power supply used 5 volts 5 amps. The garland is fastened to the window with an adhesive tape and it does not interfere with opening the window for ventilation. The Arduino board is connected below, there is also a common power bus on the bottom of the wire with a cross section of 2 * 0.75 mm. The maximum current consumption of about one ampere, judging by the multimeter, but the usual charge of 2 amps from a mobile phone I could not cope with this load.
The project is quite simple and it should be repeated. I spent a couple of evenings to solder everything, the setup took only a few minutes, and the effect is simply amazing! Congratulations to all the upcoming New Year! Creative success!
Project page on Alex’s site https://alexgyver.ru/gyvermatrixbt/
Firmware and libraries https://github.com/AlexGyver/GyverMatrixBT
I bought the tape here https://44ru.ru/Ffx3sO
Finished tape https://44ru.ru/3iA12G
Arduino https://44ru.ru/1BruxS
Cool Christmas tree garland https://44ru.ru/gWeNXX
Add comment
Random DIY
-
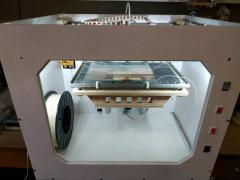 I present to your attention a homemade 3d printer. Assembled from plywood, aluminum, plastic and Arduino. This printer is unique in that its kinematics is peeped from Ultimaker, but done with quality modifications.
 -
 A simple planer from an old chisel, a couple of pieces of wood and two pieces of plexiglass.
 -
 Hello, dear friends! My name is Dmitriy or just Dima :) I'm the creator of the ModelMen.ru site, I did it specifically to collect the most interesting ideas and handicrafts created by myself.
 -
 I need a tachometer to calculate some mechanisms. For example, to calculate the speed of a robot vacuum cleaner, you need to know the rotation speed of the electric motor and, based on this, calculate the gear ratio of the gearbox.
 -
 I decided to try how my homemade 3D printer will cope with small models, for this I chose mini-toys and printed them.